Automatic driving tutorials
Online automatic driving tutorials
We've had online driving tutorials on the website for over ten years now, but these are for manual vehicles. So now I feel it's time to start producing automatic online driving tutorials, especially seeing as how half the instructors at the school teach in automatics. Here are the first three lessons everyone needs to know before they start actually driving their car.
Cockpit drill
The first lesson covered by all driving instructors.
It's good practice to always ensure you and your passengers are safe before going anywhere. Ideally, before you move away, you should perform a "cockpit drill". You will be expected to do this during your exam, even though the examiners know you have driven to the test centre and the car is set up for you.
The first part of the cockpit drill is to make sure the car is safe
Door (1) - Make sure these have all been shut. Pull on the handle if need be. Look out for the interior light staying on, this is a clue that something is not closed correctly.
Handbrake (2)- Give this a firm tug (or with electric handbrakes, make sure the red light is on. A red ! mark will also be illuminated on the dash board); make sure it's holding the car still. Without this anchor, the car may move away unexpectedly when preparing to move away later.
Gear stick (3)- Even though your car is an automatic, it still has gears. make sure you're in P for park or N for neutral.
The second half of the cockpit drill is about you
Seat (4)- Adjust it so you can fully depress each pedal without over extending your leg. There should be a bend in the knee still. Seats can often be moved forwards and backwards with the lever/bar under your chair. You can also adjust the rake (how reclined you like to be) with your hands turning the dial/pulling on a lever by your hip. Seats can also be moved up or down with a lever in some cars. There's nothing wrong with being high up. The higher you are, the more you can see. And the steering wheel can also, potentially, be adjusted up and down and closer or further to the driver.
Mirrors (5)- Frame the rear window with the interior mirror. Make sure not to leave finger prints on the glass, otherwise this can distort the image behind you. The door mirrors should be positioned to have a slither of the car door visible in the part of the mirror closest to you and the horizon just above half way up. These are often controlled electronically from inside the car. The ignition needs to be on to have the electronics working for this. Some older cars will require this to be adjusted by hand.
Seat Belts (6) - This is the last thing you do. Don't pull out reams and reams of belt, keep it fairly tight and once you have clicked it in, run your thumb and forefinger across the belt to make sure there are no twists in it. Twists can lead to injuries in the event of sudden braking or crashing!
The controls
The second thing all instructors will cover. You need to know how to control the vehicle before going anywhere.
The controls of a car are very similar to one another. It's easy to feel overwhelmed when you first start as each hand and foot has many different tasks to perform, often very different from one another. Through repetition and muscle memory, you'll pick it up before too long. Here are the basic controls of a car.
The pedals
Your right foot is the only one you'll be using to control these.
The Accelerator is the pedal on the right.
It's used for making the car go faster, it allows fuel/power to flow into the engine/motor. The firmer you press it, more fuel/power enters the engine/motor and the faster the car will go. Come off the accelerator and the car will reduce it's speed. The speedometer is the large dial or number on the dashboard and this informs you of your speed in miles per hour.
The Brake Is the big pedal to the left of the accelerator.
Make sure you can easily move between the pedals by sitting correctly. This is the pedal that will save you! The brakes work evenly on all four wheels and illuminates the rear brake lights (red lights) at the rear of the car once the pedal has been pressed. Braking should always be smooth and progressive. Gentle at first, getting firmer and then gently releasing some pressure off the pedal as we come to a stand still.
Steering
The steering wheel is used to make the car change direction. The hands must feed the wheel using the 'pull-push' method of steering. The top hand pulls the wheel into a corner/bend/junction whilst the other hand pushes the remaining turn required from the base.
This could feel very weird to begin with and I'd recommend doing what ever you need to make sure you just stay on the road when you first start. However, you'll need to become disciplined in time. You can practice this at home by turning a dinner through your hands in one direction a few times, then back the other way.
The hands must not be allowed to cross one another whilst steering. Your hands should always be in the 10-2 (9-3 is also acceptable) position. If the steering wheel were a clock face, one hand rests at 10 o'clock whilst the other sits at 2 o'clock. This allows for better control of the car.
Watch Our Video Steering a Car
Indicators
These are found on the stalk to the left of the steering wheel. It's located here so that you're able to operate them with your finger tips whilst keeping some element of your hand on the wheel. Push the stalk down when wanting to turn left and up for right. When you apply the indicators, orange lights flash on the corresponding corners of the vehicle alerting others to your movement intentions. Try to get into the habit of letting the car cancel these for you once your turn has been completed.
Windscreen wipers
This is the other stalk on the right of the steering wheel. Down towards to the ground will activate them. Usually there are multiple speed settings and you'll need to asses which is best in accordance to how hard the rain is coming down.
Moving off and stopping
There are two absolute key routines you need to learn here before going much further. POM and MSM. You'll need both of these for moving off and stopping.
Moving Off
The first thing you have to learn is how to P-O-M. It stands for Prepare, Observe, Maneuver. This is the routine you'll use every time you are stationary.
To Prepare the car you firstly turn it on. Then press the brake and keep your foot there. Then with your left hand take the gear stick and put the car into drive (D).
Take the handbrake off.
The car at this stage is prepared. The only thing holding you back from moving is the brake. Stay on it.
Next you need to Observe. The golden rule I tell my students is to not slow anyone else down unnecessarily. So observations at this point are key.
Firstly check your interior mirror, then right door mirror, then over your right shoulder into your blind spot. This is a huge area, bigger than what the mirrors cover. Show the examiner the back of your head, then you'll know if you've covered this area correctly or not.
If it's clear and safe, come off the brake and
Maneuver. The car will instantly start moving, so be ready to steer and off you go.
Stopping
This is where we need to use the M-S-M routine. Mirror, Signal, Maneuver. When we need to reduce our speed the first thing we do is check our interior mirror. This is to check the speed and position of the cars behind us. Because if they're close, your braking need to be very early and light to warn them you're slowing down and preventing them from going into the back of your car.
Then we check our left door mirror for cyclists and scooters.
We then Signal to the left to indicate to all road users what our intentions are.
The Maneuvering section is broken down into three separate components. Position, Speed and Look.
After checking the left hand side is clear, we change our position and steer towards the pavement. Gently.
Whenever we intend to stop and as soon as we feel we have the momentum to make it to our stopped position, we start easing off the accelerator. We then apply the brake and control the Speed. Make it progressive and smooth. Using the foot brake illuminates the rear brake lights, which is another form of signal in the M-S-M routine and can actually happen before the indicator later on when travelling at higher speeds.
Look for somewhere safe, legal and convenient to park up. Have a target in mind to practise what level of pressure to apply to the brake to achieve a certain result.
Once the car has stopped, keep the feet still! Fully apply the handbrake, put the car into neutral, cancel the signal and then relax your feet.
Now that you know about moving off and stopping, you should look to practise this is quiet areas to begin with with plenty of parking options and few parked up cars.
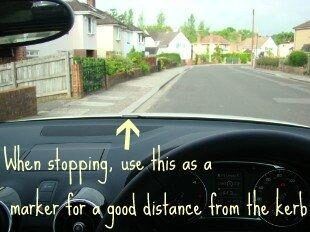
How close to the kerb am I?
A little reference point tip. Some struggle with estimating where the kerb is when parking. It's difficult to begin with. If you really need help, use a reference point on the wiper blade. In this photo, when the kerb stone is inline with the knobbly bit of the wiper blade, the car is about 10 cm from the pavement. All cars will have something you can use for this.
Be careful not to fixate on this when on the move. Use it for a little bit, then use your judgement.